Starry, starry night: the Garland Garden ceiling

“I want to use the area under the deck for sitting and entertaining, but I don’t want to look at the underside of the deck.”

Such was the challenge laid down by our client at the initial briefing for what would become the Garland Garden.

The deck had been added before our client bought the house, and it hadn’t been constructed with a great deal of care. Whilst recent architectural renovations had better integrated the deck with the house, underneath was a different story.

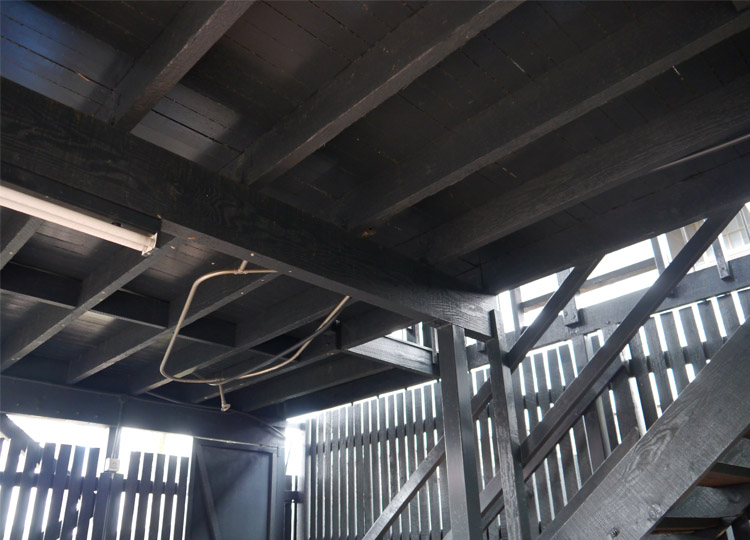
As well as providing a more visually interesting experience, we also had to consider options for nighttime lighting, and a solution that would survive hosing down the deck above. It also had to work with our scheme for the rest of the garden, which was going to be better integrated with this part of the house.

After exploring a few options our client quickly selected a proposal for a series of panels perforated in a decorative pattern, all to be backlit by lights fixed under the deck.

We hunted for inspiration for the pattern: needing something that related to both the circular forms in the garden, and the orthogonal geometry of the house and deck. Arriving early for a meeting one day I noticed a pane of stunning old glass at the front of the house, and we had our inspiration.

Over several months we refined the design.

We started with the glass pattern and edited it into a garland form.

We then had to find a way to turn the ‘starburst’ pattern of the glass into lines on the pages.

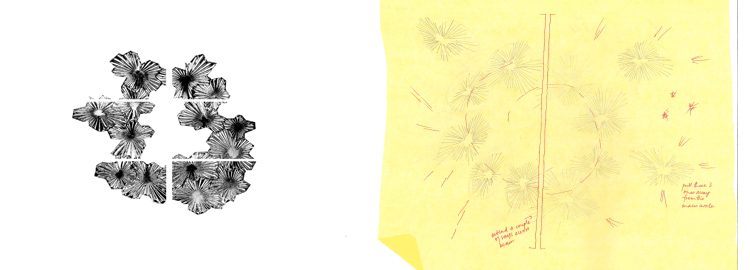
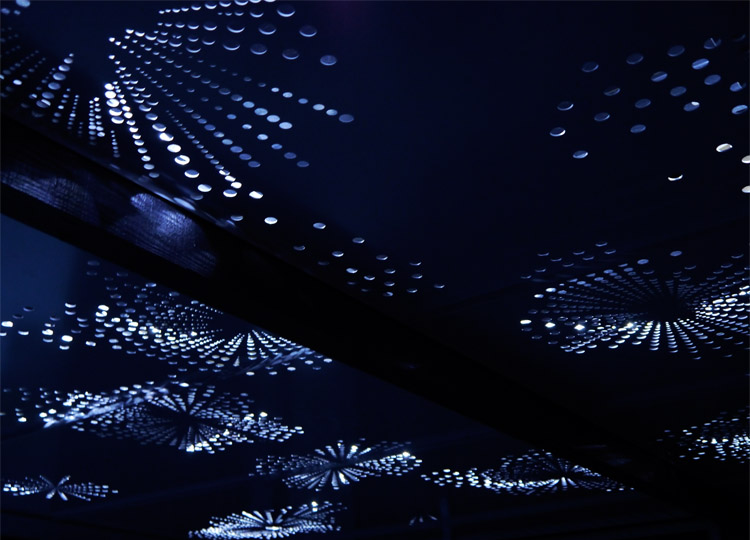
We decided to create each line out of many smaller circles, increasing in size and spacing as they moved away from the centre.

Full-scale paper mock-ups were printed, and we laboriously cut out the holes to test the perforation pattern.

Additional starbursts were added in the four outer corners of the panels, to maximize the lighting effect, and we introduced four recessed downlights for times when stronger lighting was needed.

The panels were fabricated in aluminium, laser cut and powdercoated in a dull silver colour that fitted with the new pavement finishes and existing house.

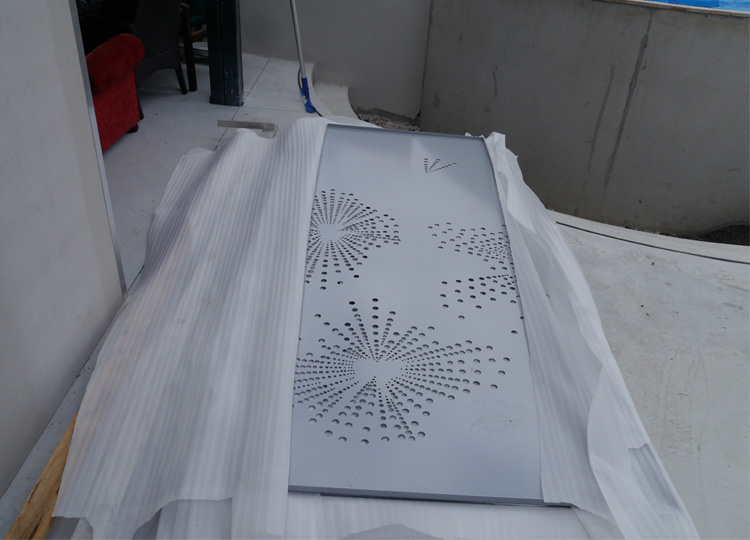
LED lights were installed above, and the panels fixed in place.

The colour of the panels changes over the course of the day, especially towards evening.

By the time the sun has set the backlights are twinkling and the panels themselves become virtually invisible.

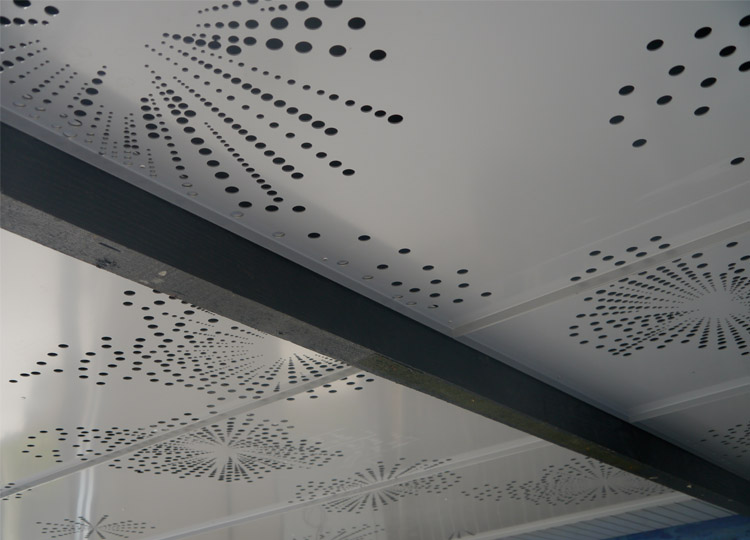
Our client now loves to sit out under her own starry sky in the evening, and we are thrilled to have helped transform a forgotten and underutilised part of her house and garden into an artful, and unexpected beauty.

Now it’s over to you.

What did you think of the new Garland Garden ceiling? Perhaps it’s given you hope that a difficult part of your home and garden can be transformed into something you love. I’d also like to know if you enjoyed seeing the different stages we went through to design the final pattern. Let me know in the comments below.

And of course, sharing is caring, so if you know someone else who might find this interesting, why not send it on.

See you soon for more garden, landscape and design stories. Oh, and we’ll also be featuring more from the Garland Garden in the coming months.

Design Class: shade

Plan now to beat the heat next summer.

If this summer has left you more hot and bothered than hot and happenin’, then don’t despair.

As the season officially draws to a close it’s a good time to make some observations so you can plan ahead and be prepared for next summer.

While the sun is still high and the days are long, take a good look around the garden and bear in mind the following three questions:

Question 1: what time of day do you plan to use the garden space in question?

Seems obvious huh – the day time. But you mightn’t actually need shade throughout the whole garden from sunup to sundown.

If you’re an early riser who enjoys having your first cuppa and breakfast out in the garden, then it might be most important for you that there is shade then.

If you have young kids at home you’ll also be an early riser (!), but it might be more important that you have some consistent shade throughout the day. That way there’s always somewhere sheltered available for running around, playing with the hose and splashing paint about.

Maybe you have dogs, and you’re out at work all day. It’s also important that they have access to somewhere shady through the hottest part of the day and year.

But if you dream of having sunset drinks without burning out your retinas, then some late afternoon shade might be what is required.

Anyone for Pimms?

Anyone for Pimms?

Question 2: what type of shade do you want?

Again, this might seem obvious, but there are many different types of shade.

Think of the huge fig trees you see around Brisbane. They create a pool of shade that is deep, dark and noticeably cooler (left below).

Other tree species have a more open canopy and form, and consequently they cast a shadow that is lighter and more fragmented (right below).

Deciduous trees, of course, seasonally change the amount and type of shadow they create. They can be a good choice if you're after summer shade and winter sunlight.

Remember that shadows also change with the seasons. In summer, the sun is higher overhead, so shadows are smaller and closer to the object casting the shadow (left below). In winter the sun is lower in the sky, resulting in shadows that stretch out a long way away from the source (right below). Your neighbour’s palm shadows for example, are close to the trunk in summer, but could be falling over your garden in winter.

Try and think about what type of shadow you’re after, and then consider the ways that could be achieved.

Question 3: how patient are you?

This might seem like a personal question, but it pays to be honest with yourself in order to get a result that fits. The two ways we can create garden shade are through live elements – trees, shrubs, climbers trained over arbors and trellises; and built elements – rooves, shelters, screens and the like.

Unless you can afford to import a mature tree, all plant material will require time to establish in your garden and grow. This is true even if you select the right species for your area and provide optimum growing conditions.

Until the plantings are doing their job, you might have to rely on some temporary shade solutions – maybe some cool umbrellas.

If the thought of waiting 5, 10, or even more years until the vines clamber over the pergola or the tree reaches full height fills you with anxiety, you might need to consider a built solution.

As well as the benefit of shade without the wait, this allows you to complement the architectural detailing of your house. You have to consider all the seasons carefully though, as there aren’t too many deciduous rooves around if you also need winter sun. And of course, structures require maintenance, just like the rest of your house and garden.

Often, a combination of built and growing shade solutions can be tailored to meet your exact conditions and requirements.

Pergola structure with newly planted climbers (left), temporary shading (centre) and fully grown (right).

Pergola structure with newly planted climbers (left), temporary shading (centre) and fully grown (right).

Now it’s over to you.

Did this help you consider some of your garden shade options differently? Feel free to confess if you suspect you’re an ‘instant shade’ person or not, and how you might plan your attack in response.

If you think someone else might benefit from this article, please share it with them. If you liked it, then hit us with a big heart below.

Thanks for reading, and see you soon for more garden, landscape and design stories.

Jamison Square Fountain

A cascade, a pool, and so much more...

Water is one trick designers always have up their sleeve if they want to attract a crowd.

A true honeypot of public space design, thoughtful ponds, cascades, rills, reflecting pools, pop jets, bubblers and other watery wonders will draw people in every time.

They can be big, small, solemn or silly, and some of them manage to appeal to people of all ages. A rare few even look good without any water.

One such marvel is the Jamison Square Fountain in Portland.

The Fountain was built in the mid-2000s and is a well-publicised urban water feature, but it’s worth revisiting to remember just why it’s been so successful.

1. A catalyst for change

Jamison Square was a catalyst project for the redevelopment of the Pearl District, to the north of downtown Portland. Once home to railway yards and light industry, The Pearl is now a textbook urban renewal neighbourhood of mid-height buildings, thousands of new residents, ground floor shops, generous, walkable footpaths, convenient public transport and a variety of parks and public places.

2. Simple concept

The design concept is incredibly simple. There are only three elements to Jamison Square: a timber ‘boardwalk’ – a timber footpath effectively, that runs along each block of The Pearl towards the river, and recalls the former riverfront walkways; a gallery – a number of large-scale public artworks are installed; and the fountain itself.

Looking into the Square from above. The boardwalk is in the foreground. Look for the row of stone blocks snaking through the middle of the park. Image: Flickr User pondskipper via Wikimedia Commons.

Looking into the Square from above. The boardwalk is in the foreground. Look for the row of stone blocks snaking through the middle of the park. 
Image: Flickr User pondskipper via Wikimedia Commons.

The contemporary totem is one of four artworks marking the entries to Jamison Square.

The contemporary totem is one of four artworks marking the entries to Jamison Square.

3. An engaging experience

The backbone of the Fountain is a long wall, slightly curved in the middle. It is made of chunky, stacked stone blocks, perfectly arranged for little kids to negotiate the top with someone holding their hand, or for big kids to dash along.

Beyond the wall the stone stacks decrease in height and vary in spacing. In some places it’s still possible to make the entire journey on the stone steppers. Elsewhere it becomes trickier once you add in…the water.

On regular intervals water starts to spill out of cracks and crevices in the rock. It starts in the middle with a tiny trickle, then moves on the rock stack next door, then the next one, then the one in front, and so on until it some places the water is 300mm deep.

The pavement in front of the wall slopes gently down, creating different water depths, and allowing kids of all ages to enjoy the experience.

Once the basin is full the water slowly drains away, till only the stones remain and the whole process starts again.

4. A versatile space.

The Fountain has been designed to be experienced both with and without water.

 The water can be drained and the Fountain used as amphitheatre seating for events in the Square.

 The water can be drained and the Fountain used as amphitheatre seating for events in the Square.

5. A user-friendly space.

Movable folding chairs are scattered around the Square, easily repositioned according to your preference for sun, shade, distance from or closeness to the Fountain. The street blocks are small and the footpaths generous, so it’s easy to get to the Square, in fact it’s almost impossible to avoid it as you’re walking through the district. The quality of construction is excellent and maintenance is obviously a priority, all contributing to the sense that this is a well-loved and highly valued piece of the city.

Now it’s over to you.

What do you think about Jamison Square Fountain? Let me know one thing that appealed to you the most. Of course, if you’ve visited Jamison Square, I’d love you to share your thoughts on the experience.

If you know someone else who might find this interesting, why not share it, and if you liked it ‘heart’ us below. Go on...give it a shot.

Thanks for reading, and see you soon for more garden, landscape and design stories.


Note: Jamison Square Fountain was designed by PWP Landscape Architecture. It is located at 810 NW 11th Avenue, Portland. It Find out more about the history and opening hours at the City of Portland website.

Although we visited on a rather bleak day, lot's of people were still engaging with Jamison Square Fountain. This image gives a glimpse of what it's like on a summer's day - pandemonium! If you're in Portland in summertime, go check it out.Image: Ga…

Although we visited on a rather bleak day, lot's of people were still engaging with Jamison Square Fountain. This image gives a glimpse of what it's like on a summer's day - pandemonium! If you're in Portland in summertime, go check it out.
Image: Gary Halvorson, Oregon State Archives.

Design Class: pool fences

Four ways to comply with the regulations without feeling like you're behind bars

I am by nature a heat-averse person. Sweating may be fine for the gym, but sizzling in the sun is waaaaay down on my list of fun things to do.

So with our recent bout of balmy (barmy, more like it) weather, I’ve been feeling extreme sympathy for the builders stuck on site finishing my current project. It must be tormenting to have a fabulous new pool sitting right there and not be able to jump in for a quick cool down.

It’s times like this you start to think longingly about pools. Would you get a long pool so you can swim laps? A deep plunge pool? Something clean and crisp and orthogonal? Tiled or not?

With so much to consider, one thing that is often overlooked is the pool fencing. Mandatory for all pools in Queensland, fencing must comply with strict regulations prescribing the height of barriers and prevention of climbing, amongst other things.

Sadly, meeting these requirements and having a good looking pool area often seem like mutually exclusive goals for many pool owners.

If you have an existing pool the fence has to snake its way through and around the existing paving and garden areas.

If you have limited space you often end up with the pool fence jammed right up beside the pool edge, and no space for lounging or sitting beside the pool, right where you want to be.

And the most cost-effective models of pool fencing available can make you feel like you’re sitting inside a jail cell, rather than in your relaxing outdoor living room.

Luckily, if you’re considering installing a new pool there are four tricks for beating the curse of the jailyard pool fence.

1. The Pool Wall Fence

In this scenario you use the wall of the pool itself as the pool fence. The pool sits above the surrounding ground surface, requiring only a small amount of ‘traditional’ fencing to protect the entry to the pool area.

This can be good if you have limited space, as all the area around the pool remains free and useable, with a minimal fenced entry area that can be screened with a wall, or open with a balustrade.

Plans on the left show a pool with conventional perimeter fencing, and then reduced fencing on the right, achieved by raising the pool out of the ground. Sections on the right show how raising the pool enables the pool wall to be used as the pool fe…

Plans on the left show a pool with conventional perimeter fencing, and then reduced fencing on the right, achieved by raising the pool out of the ground. Sections on the right show how raising the pool enables the pool wall to be used as the pool fence and a garden feature.

You can use the outside of the pool wall as a design element in the garden: paint it, tile it, or leave it raw concrete as we've done at our Garland Garden project.

This approach works really well on sloping sites, where you can fence your outdoor living area, and the leave the rest of the pool emerging from the ground as the slope falls away. This type of pool is also crying out for a ‘horizon edge’, where the water cascades over the exposed walls to a catch trough below.

Once inside the fenced area the paved area flows directly into the pool, with nothing interrupting the view. Water flowing over the horizon edge looks great to people viewing the pool at the lower level.

Once inside the fenced area the paved area flows directly into the pool, with nothing interrupting the view. Water flowing over the horizon edge looks great to people viewing the pool at the lower level.

2. The Ha-Ha

This works really well if you have a bit more space to play around with, but it can be used in smaller spaces too.

A ha-ha is a fancy word to describe a sunken area between two pieces of land (OK…a ditch). It creates a barrier without disrupting views across.

In picturesque English gardens ha-has were used to separate the sheep in their fields from the gentry in their pleasure gardens. In contemporary gardens ha-has can be used to comply with pool fencing requirements without looking out at layers of fences.

Using the ha-ha allows continuous access from the pool terrace to the adjacent garden, and enables uninterrupted views across the garden.

Using the ha-ha allows continuous access from the pool terrace to the adjacent garden, and enables uninterrupted views across the garden.

3. The Fancy Fence

Seems obvious in a way, but sometimes we’re so used to seeing conventional pool fences that we forget they don’t have to be made out of glass, or straight lines of aluminium rods.

What about panels with a decorative perforated pattern that can be backlit at night to sparkle? 

Or consider taking your fence on a journey through the garden, like a piece of wandering sculpture. Then you can enjoy some of the lovely parts of your garden whilst still being able to access the pool. This works really well if you have some space to play with.

4. The Green Fence 

This final option uses the bog-standard aluminium pool fence but hides it in the middle of a planted screen. As the plants grow you’re left with a hedge that you can either trim or leave shaggy, whatever best suits your design, but you’ve still achieved your fencing requirements.

Of course, the diagrams above are intended purely to illustrate how the four ideas work, they are not designs or detailed solutions in themselves. Every garden is different, and your particular circumstances must be carefully understood and considered before adopting any of these ideas, to make sure you get the best result to suit your requirements.


Now it’s over to you.

Did this help you consider some of your pool options in a different light? Please let us know your thoughts in the comments below, or share how you’ve re-imagined your pool fencing to create an integrated garden and outdoor living space. If you’re dreaming of a pool, what are your considering?

If you know someone else who might find this interesting, why not share it, and if you liked it ‘heart’ us below.

Thanks for reading and see you soon for more garden, landscape and design stories.


Note: Pool fencing regulations vary across local authorities and states. Make sure to check with your local council for their requirements.

Back of House

A confession: sometimes I like the backs of buildings more than I like the fronts.

Sometimes this happens even when a great deal of attention has been lavished on the front: making sure it’s well proportioned, handsomely constructed, and tidily maintained. To tell you the truth, oftentimes the swisher the front, the more likely it is that I’ll like the back.

Why?

Because the back of many buildings is where they let it all hang out: draping themselves in skeins of tangled pipework, erupting in acne-like outbreaks of box air-conditioners, bedecking themselves in ill-considered extensions and add-ons, and casually infilling gaps and windows and unwanted openings with patchworks of random materials. 

It’s rude. It’s not always pretty. But gee, it’s often really, really interesting. 

Don’t you think?

Here are a few other backs I've taken a shine to: 

(Of course I'm not telling you where they are - knowing a little secret spot that thousands of people walk past every day without noticing is part of the fun!)

Now it’s over to you.

What do you think of the backs of buildings? Have you ever thought the bit you weren’t meant to be looking at was more interesting than the ‘official’ public façade? Maybe you have a favourite?

I’d love to know your thoughts – join the conversation in the comments section below.

If you know someone who’d enjoy reading this article be sure to share it, and check back soon for more from the wonderful world of landscape, architecture and design.

ps: Back of House was the inspiration for my little series of three linoprints, currently showing as part of the Brisbane Open House Art in Design Exhibition. If you're in town, pop in and see terrific paintings, drawings and prints by Brisbane designers.